
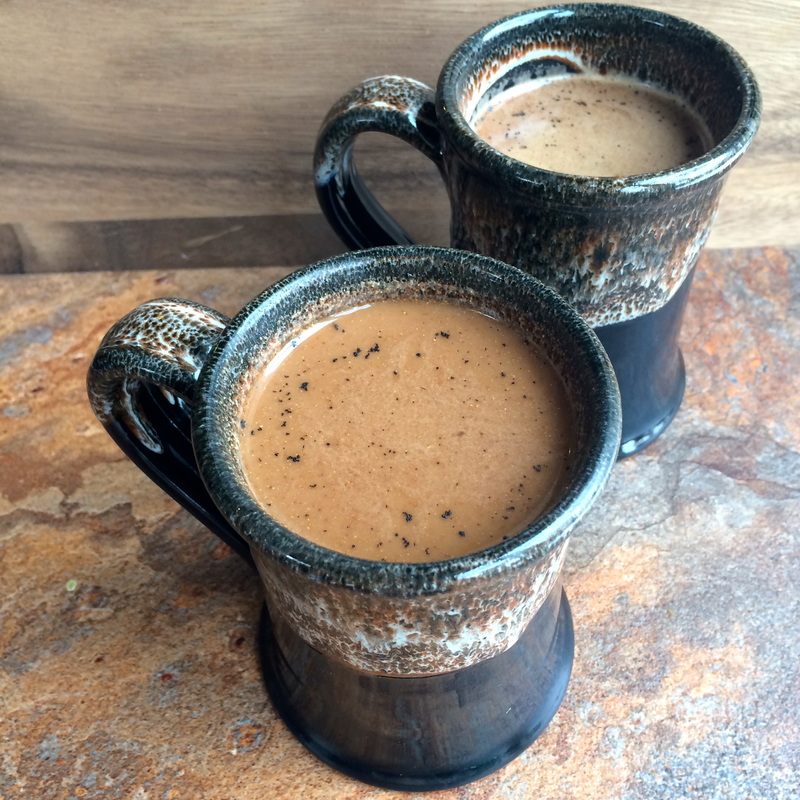
 Warm creamy beverages are popular in this house. I have a husband who works from a home office and is on his feet in video conferences quite literally all day long. He has Raynaud's Phenomenon, meaning his fingers (and toes) turn white and then blue from even a mild chill. BUT, if he drank hot coffee all day long he would bounce off of the walls. So I like to rotate by making my own tea blends, coffee drinks, warm ciders, and this. Maple Maca Mocha. It is so delicious (and in summer is fantastic iced). The main ingredient, Maca, is considered a superfood. It gets that moniker from its adaptogenic properties and the fact that it is super high in minerals, sterols, essential fatty acids, fiber, protein, and amino acids. Maca is a root vegetable which has been used in South America for ages as a food staple and herbal boost for stamina, stress, and energy. If you look at PubMed, you can see many studies have shown that Maca can indeed increase stamina, reduce muscle fatigue after workouts, lower anxiety and depression, and may boost hormonal function and sex drive (woo hoo!). So not a bad ingredient to add in a frothily delicious drink on a chilly morning!
{how to} Warm your coconut milk in a pot on your stove. Add your scraped vanilla bean and whisk to get it all distributed. You can place the whole bean shell into the pot to infuse more vanilla flavor too (just pull it out before serving). Whisk in all the rest of the ingredients. Keep whisking. Keep whisking. Let it warm up on the stove for 5-7 minutes, whisking every minute or so. DO NOT boil. You just want to warm it enough to dissolve the cocoa/maca/spices and get to a nice drinking temperature. Remove from heat. Whisk again and remove your vanilla bean. Taste it. I like mine just like this. My husband likes a little more sweetness, so I add coconut palm sugar to his to taste. If you like, zest a little organic orange over the top. Drink! This makes 2 large mugs of Maple Maca Mocha (say that fast three times). Maca is in the Brassicaceae family, so if you have allergies to mustards, crucifers or cabbages, etc. you should probably avoid it.
5 Comments
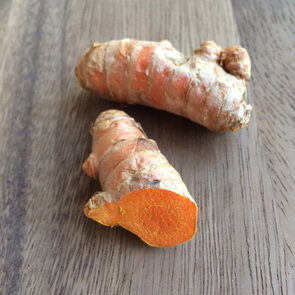
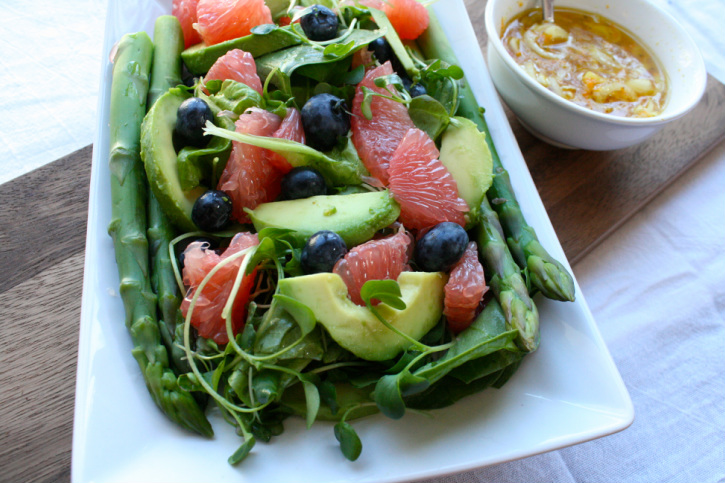 This is the time of year when I start craving vibrant, fresh, crisp, crunchy. Citrus is a great winter food, and combined with the anti-inflammatory punch of turmeric, ginger, and garlic, it is out of this world. Recent studies have shown that turmeric is not only anti-inflammatory and anti-viral, but also boosts your mood. And in late February, I can use all the boost I can get. I grow my own micro greens and lettuces in my dining room in the winter, but you can use any greens you like — lettuce, spinach, arugula — take your pick! This makes about two meal sized salads. Double up if you want more servings. Make the dressing first and let it all steep together in a bowl while you do the rest. It will infuse the onions with all of the flavors. The salad needs three-fourths of a grapefruit — with the last 1/4 remaining to use for the juice in the dressing. {dressing} 1 clove garlic, minced 1 small onion (or 1/2 a big one), halved and very thinly sliced 1 tsp freshly grated ginger root 1 tsp freshly grated turmeric* 2 Tbsp coconut vinegar 3 Tbsp extra virgin olive oil Pinch of salt & pepper Juice of about 1/4 grapefruit MIx all of the dressing ingredients in a bowl. Stir well and let it sit while you work on the rest of the salad. {salad} fresh greens: micro greens, lettuces, spinach 1 grapefruit (3/4 for salad, 1/4 for dressing) 1 avocado, sliced 6-8 asparagus spears, steamed or lightly simmered (don't overcook) 1/2 cup fresh blueberries (pomegranate is tasty too) Steam or lightly cook your asparagus spears over simmering water. Don't overcook! They should remain bright green, so it only takes a minute or two! Retrieving a grapefruit from its pithy coat may not be the fastest or easiest project, but it is worth it. While you can cut a grapefruit in half and retrieve the little bit as you would when you eat grapefruit out of its own bowl, I like the bigger pieces that you can get when going for the whole segment. To do this, peel your grapefruit. Remove as much of the bitter pithy parts as you can. Gently open it in half as you would when eating an orange. Now, remove the skin from each segment. Do this for most of the grapefruit segments, leaving 2 or 3 segments to squeeze into your dressing. This salad is now mostly assembly. Place your greens/lettuce on the plate. Add your sliced avocado, grapefruit segments, and blueberries over the top. Slip in your avocado spears. Stir your dressing well, and drizzle over the top, adding some of the slices of onions that are now deliciously marinated as well. 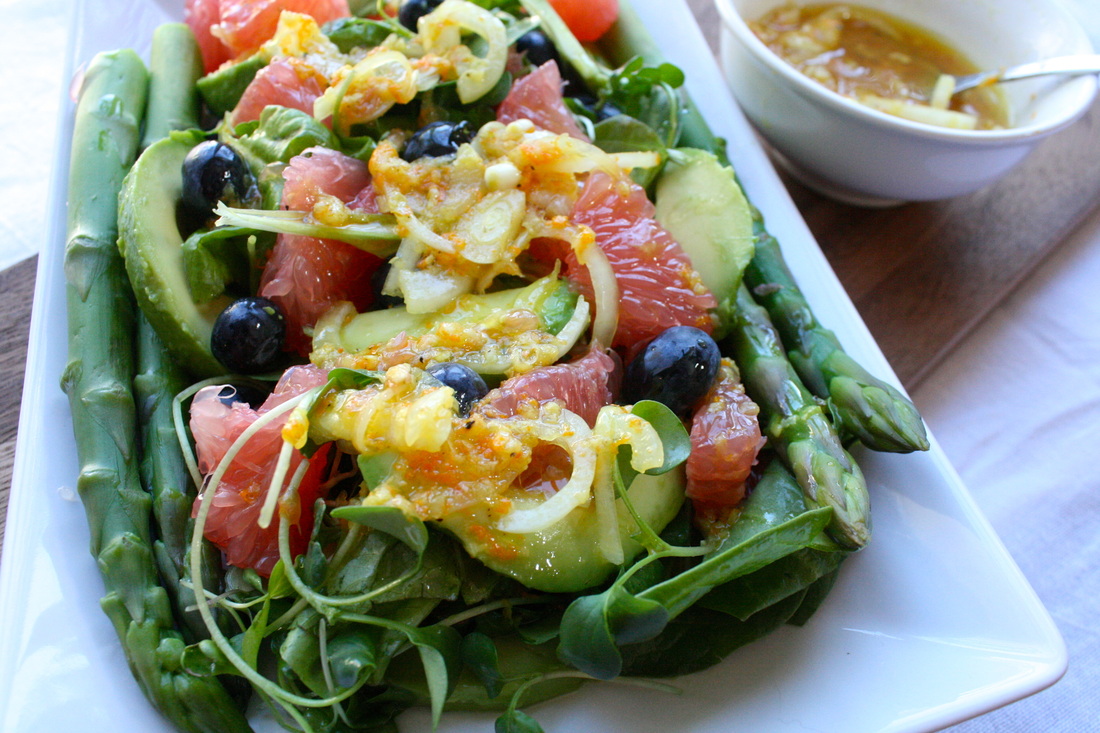 Now all that is left to do is EAT!
WAIT!
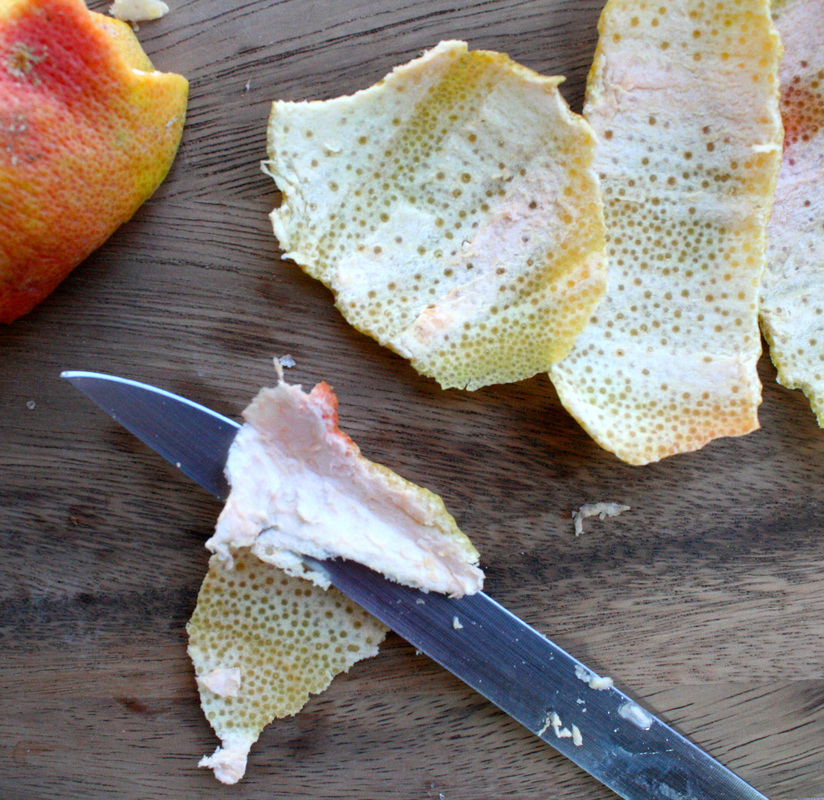
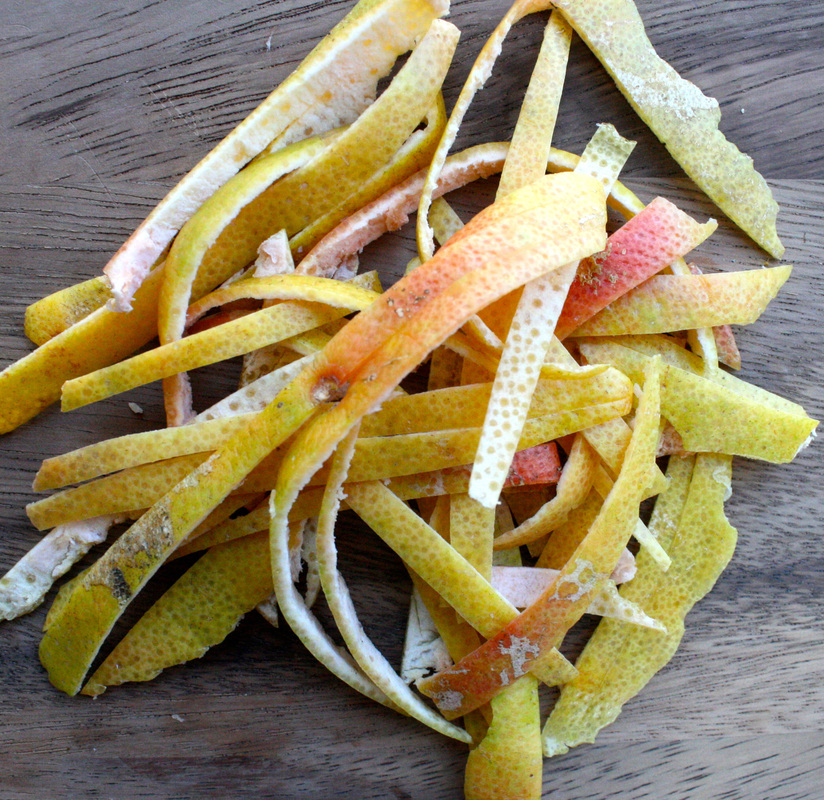
Don't throw away your grapefruit peels! Dried organic citrus peels have many uses. I add them to tea blends, mulling spices, or chai. Take your peels and, using a thin knife, slice away as much of the white pith as you can (I like using a fish knife - it is thin and makes the job easier). Then slice into strips and dry in your dehydrator until fully dry and crispy. If you don't have a dehydrator you can dry on the LOWEST oven (or toaster oven) setting on a cookie sheet for a *short time* until dry. Store in an airtight container, and add to tea or spice blends.  Welcome to Wholly Rooted. As my friends know, I have taken a break from blogging for awhile, focusing on writing and photography and communicating mostly via Instagram and Facebook. We had a few rounds of allergy testing on both of my boys, which gave us answers we needed, but greatly impacted our lives and habits. While we have always been a whole foods kind of family, learning of so many severe food allergies for my older son answered so many questions and yet also changed everything about what we eat, how we shop, where we go, and how we prepare meals. Since then, we have been working to adjust our diets to accommodate the varying needs of the four of us. It was a lot of learning, experimenting, and adapting, but we have found our groove!
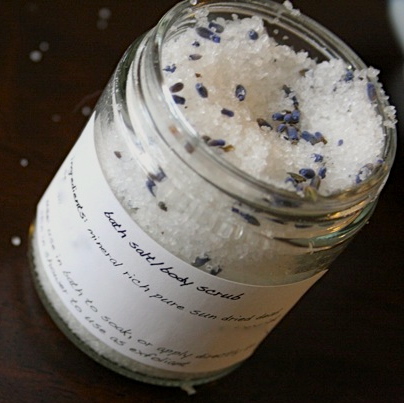
As we worked through allergies and intolerances and adjusted diets I realized I wanted to learn more about the science behind nutrition and herbalism. My own decades of experience in herbalism, natural home, organic living, and whole foods gave me my own experiential knowledge, but I felt like I needed a lot more in depth knowledge to help my family through so many allergies and intolerances while also healing and improving. I don't want my severe food allergy son to just survive his allergies, I want him to thrive. And so I recently began programs in both Natural Nutrition from CSNN, and Family Herbalism from Vintage Remedies. Both are evidence based with a healthy dose of facts and I am really enjoying it. By having a deeper understanding of the foundations of our bodies, cells, immune systems, and processes, I feel like we are able to heal and sustain, improve, and feel great! While it is a learning journey that will continue for years to come, I have been so happy to see my son feeling better. I'm so happy that *I* have been feeling better (more on that soon). During all of this I started working on a few projects which include my writing and photography. I have found there are so many families like ours who are looking for inspiration, ideas, and support - whether they are struggling with food allergies, intolerances, health issues, or just trying to incorporate more whole foods into their diets. It has made me realize it is time again to share. And while I know I will share a lot of recipes and things from my kitchen and garden, it isn't just a "food blog". In my past blogs I tried to separate life from food, thinking people who want recipes don't want to hear about my kids, people who are interested in life and unschooling don't want all my food stuff. That noone wants to hear about the needs of kids with sensory issues, allergies, or anything else. But the thing is, it is not separate. Whole Foods. Whole Life. One big juicy package. Thanks for joining me! xoDenise More About Me Where I used to blog: Mom in Madison. | Cook.Eat.Think.  I love using dead sea salts as a detox body scrub for me, and it is a great additive every week (or whenever he has a flare-up) for the bath for my son with eczema. Dead sea salt contains many minerals and has many therapeutic qualities good for the skin, the body, and healing - and that combined with the soothing/anti-inflammatory properties of the lavender and the oil relieves itching and flare-ups.
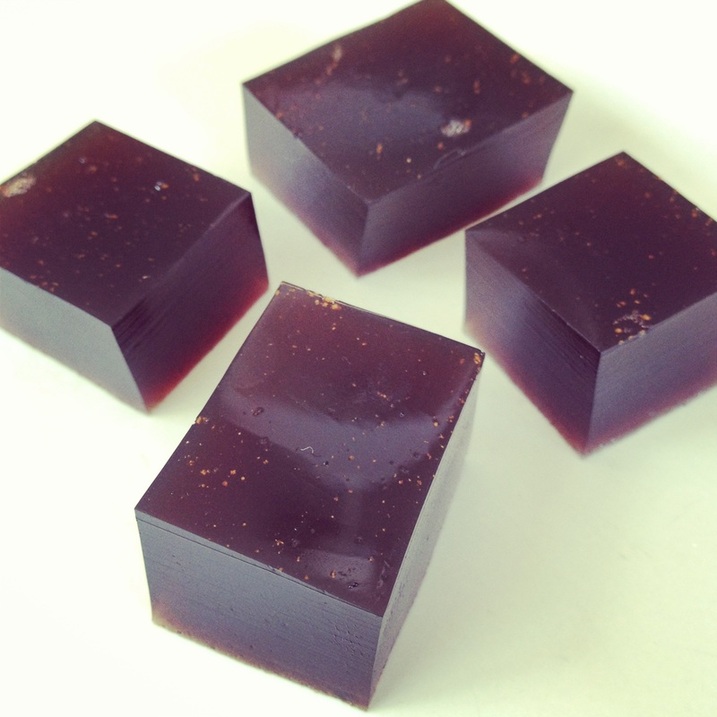 This is a kid friendly way to make a mineral rich gelatin cube with the immune system boosting power of elderberry. But don't use regular gelatin packets. Look at your local coop or natural foods store for a high quality gelatin which avoids factory farmed animals and follows healthy pastured practices to produce an excellent quality powdered gelatin. You can usually choose porcine or kosher. Kosher meaning pork free, pastured cow source only. Be sure to look to see that the kosher gelatin is from 100% grass fed cows. Porcine may include a more varied diet, although it is cheaper. My older son is allergic to gelatin as well as pork and beef, so we make this only for 3 of us. He is very allergic to pork, so no pork products come into our home just to ensure safety. He is less reactive to bovine, so I am comfortable carefully preparing that for three of us without worrying about causing him a reaction. So, my preferred gelatin is the Great Lakes Unflavored Kosher Beef Gelatin. {{how to}} Make a strong tea of your choice. You can use purchased tea such as elderberry echinacea, or any elderberry herbal tea bag blend. I made my own:: 1/4 cup dried elderberries 1" knob of ginger sliced finely zest of one organic lemon Tbsp of dried rose hips Honey to taste Add all ingredients to a pot with 2 cups of water, bring to a simmer with lid on, turn down to low, and let steep 45 minutes. Strain. While still warm add 1 Tbsp of good quality gelatin (I use Great Lakes Kosher Beef collagen joint care) per 1/2 to 3/4 cup of tea. Stir to dissolve gelatin, pour into shallow container and chill. Once set cut into 1-2 Tbsp size cubes and eat daily. Tasty! 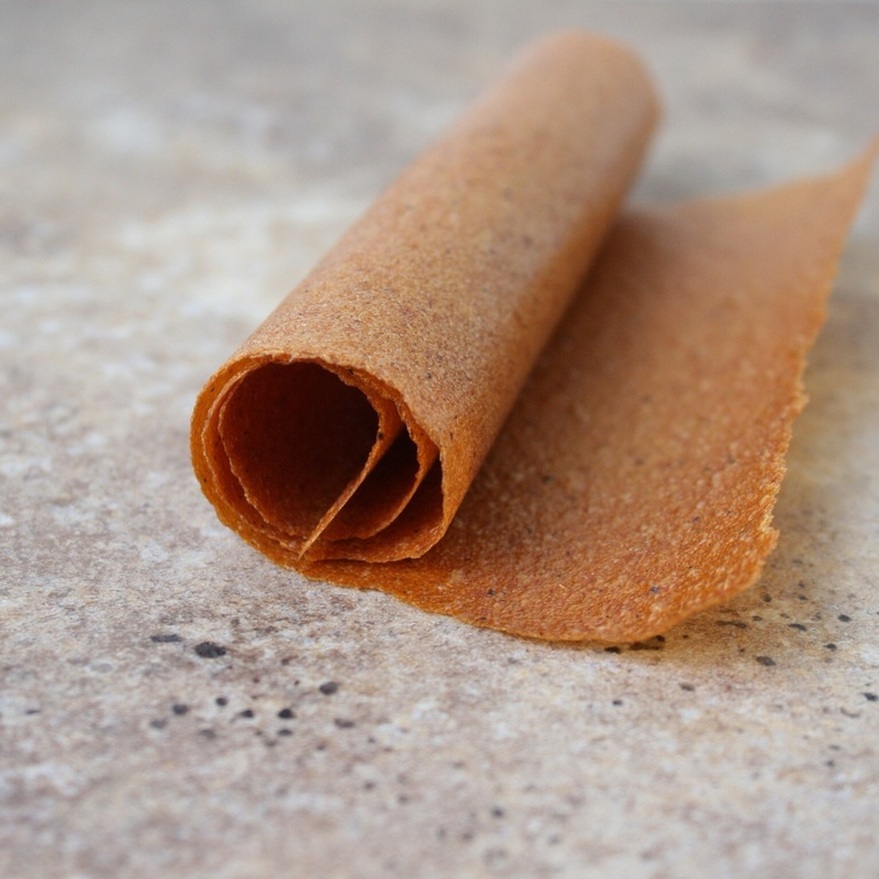 Fruit leather is a great way to preserve the season. Whether you have a case or a bowl of fruit, a few trays of the intense essence of ripe summer are at your fingertips. And by making your own, you don't need preservatives or loads of sugar. While kids love fruit leather, I send my husband off on business trips with a bag of it too, and it is shared and enjoyed immediately.
Vanilla Nectarine Leather Remove pit from 10 ripe nectarines. Combine nectarines and the seeds from one scraped vanilla bean In a blender or Vitamix, Blend on high for 30 seconds until fully liquidated and peel is gone. Taste. Ripe sweet fruit will not need sweetener, but some fruit may need a *little* drizzle of honey or maple syrup. Spread onto two lined dehydrator sheets, and dry on fruit leather setting until it is dry enough to peel without tearing, usually 2 hours or so. Peel gently and flip over on the dehydrator sheet, and continue to dry until no longer sticky but pliable. Cut into strips and roll into parchment paper while still warm. Store in airtight container! |

denise cusackI am a certified aromatherapist, clinical herbalist, permaculture designer, organic gardener, plant conservationist, photographer, writer, designer, artist, nature lover, health justice activist, whole foods maker, and mother of two young adults in south central Wisconsin. 


Categories
All
©2007-23 Denise Cusack, all photos and text. Feel free to share my posts on FB or Twitter or online media or pin on Pinterest (thank you!), but please keep the links back to my website intact (meaning please do not take or copy my images off of this website and share them unattributed or without linking back here or use them without permission). Thank you! :)
|
 RSS Feed
